tauster
Paint Manipulator

Posts: 184 
|
Post by tauster on Oct 6, 2013 8:09:58 GMT -5
You're right: There are still plenty of minis per gaming dollar (euros), better than other deals out there. But I have two major problems with it:
1) intl. backers are treated as 2nd class - which pisses me off to no end. I completely understand the economics behind the decision, but I am still pissed off. Really, I can not describe how much this angers me without becoming rude... *grumbles*
2) Compared with the 100$ for the standard package, 50 or 60$ for shipping is just not tolarable, at least for me. true, I will (would have) probably order(ed) a few optional minis so that the ratio shipping fees vs. price of goods comes down a bit, but such a huge additional cost is simply out of the question, even more if I add the taxes.
3) Add to both points above that you always get minis you didn't really want and the ones you want have to be purchased extra...
I didn't drop out immediately, but I'll wait & see until the last day of the KS. If I like the overall package then, maybe. But the giddy-ness of the first KS is definitely gone.
|
|
tauster
Paint Manipulator
Posts: 184
|
Post by tauster on Oct 6, 2013 3:27:40 GMT -5
There is already another purple worm thread, but I'll add my purple worm dice tower to the other projects gathered in this thread (even if it is not exactly a tentacle) since the general shape is similar and since I already have one small purple worm WIP here. Credit for the original idea goes to DM Scotty; I think his Purple Worm Tutorial (it earned it's capitals) is the best video he has done so far. The first pictures. The WIP so far: i.imgur.com/ut5BSh0.jpgAs this thing will be a dice tower, I have to strengthen the structure externally. I used a long cardboard kitchen paper roll, cut some sliced out of it and bent it around several times. Instead of applying hotglue for securing/fixing/fastening these bends, I used a thin but brioad (5 cm) adhesive tape; this is way faster and does the job just as well. Even better, in case you need to readjust, just rip the tape away - if you used hotglue, you would be out of luck. i.imgur.com/slKvgms.jpgI cut a hole near the base where the dice will be falling out and glued in a sloped cardboard chute. the rounded cardboard lid will close this hole (even though I have to make a new, larger one). I'll glue small neodyms (5x5x2 mm) on the inner edge of the hole and some thin metal strips (scavenged from old twist-off caps). I hope that I'll be able to cover & camouflage this lid enough with hotglue and paint so that it won't be too visible when finished. In the bottom below the lid you can see a chunk of massive hotglue and small pebbles. They add mass to the lower part of the worm, keeping the sculpture (as others said before, this is too large to be called 'miniature') from becoming top-heavy. One of my last working steps (after painting) will be to glue the whole thing in a magnetic twist-off cap, so that I can change the bases (as described in the quote above). The maw: i.imgur.com/jrHYyva.jpgI had some problems with the material I used: some kind of light structural modelling mass which unfortunately becomes a bit brittle when drying, so I added two layers of PVA glue so far. The maw is considerably larger than the body, so I'll have to add quite a lot of paper maché later on. Which is not a serious problem, because as is, the worm's body is much to slender for my taste. |
|
tauster
Paint Manipulator
Posts: 184
|
Post by tauster on Oct 5, 2013 16:19:09 GMT -5
Thanks for posting this link!
This guy has shared some really fantastic tricks, like using your car rubber mat as a mould for making bricks:
"This is just a Quick Tip on the Cheapest mold ever and the best thing is most of you already have it. Its the rubber mat you can find in your car. You can cast hundret of stones in one casting and use them for almost anything from WH40K to other Tabletops, or as Dungeons & Dragons Floortiles. I got this idea from customterrains videos so dont forget to check him out. "
|
|
tauster
Paint Manipulator
Posts: 184
|
Post by tauster on Oct 5, 2013 16:05:53 GMT -5
Bad news for international backers (like me) is that we have to pay shipping fees ourselves (shipping for US backers is paid by Reaper), and those fees are painfully high. 60 USD for the standard pack (which costs 100 USD, or something like that...  Considering that I'll have to add taxes to whatever I'll be orderng in the end (unknown amount of bonus minis...), I am seriously thinking about getting out of that deal. |
|
tauster
Paint Manipulator
Posts: 184
|
Post by tauster on Oct 5, 2013 14:26:41 GMT -5
I watched the turorial yesterday night and started crafting this noon. Definitely my favourite scottitorial ever!  I'll try(!) to make the worm mini(?)ature a dice tower, so I have to adapt Scottie's technique a bit. It is more difficult because I can not stuff the rolls with anything, so stability has to come from an outside structure, all the while the interior with all it's bends and curves has to be large enough to let the dice through. After three failed prototypes, I hope that the current one comes out workable. The good thing is that as a dice tower instead of 'only' a miniature, I can have this critter in front of me at every game session instead of using it only rarely (how often do you fight purple worms?). Lessons I learned so far: 1) To avoid the thing getting top-heavy, fill the bottom end with small pebbles mortared together with hotglue. 2) If you glue the lower end into a properly sized twist-off cap, you can put it later on to a variety of magnetic (neodym!) bases with different geographic themes. You can make an underdark base, one for deserts, one for grassland, one with exploding pavement (dungeons & cities), etc... 3) If the worm is to be looking downward at its prey and you intend to throw the dice through it's maw, you'd have to throw the dice upward. Combined with the small maw opening, this is not very practical. However, if the worm looks upward, you may have it easier with the dice, but the worm would be looking away from it's prey. There is no real solution to this, so you'll have to strike a balance between both. Ideally, you can cover it somehow visually, i.e. sculpt the maw so that although you'll throw the dice in horizontally, the head appears to be looking downward. I'm not sure get this right, but this is my first worm after all. The alternative is a kind of 'trapdoor' at the top (i.e. the critter's neck), which most probably would look silly, unless you are a true camouflage artist with hotglue texture and painting techniques. Which I'm probably not... Pictures later. [edit] Updates & pictures here. [/edit] |
|
tauster
Paint Manipulator
Posts: 184
|
Post by tauster on Oct 4, 2013 14:08:18 GMT -5
Wonderfully done!
|
|
tauster
Paint Manipulator
Posts: 184
|
Post by tauster on Oct 4, 2013 10:59:05 GMT -5
The Hot Glue drops, plus more Hot Glue, could be combined with certain pasta bits, to make a large/small Juiblex figure... The images posted reminded me of him/it/whatever. Make it more vertical, stick in a tube noodle, with lots of the beads, and you would have a close approximation of the drawing from the original, 1978 Monster Manual. Apply the appropriate, disgusting paints, and colors, glossy of course, and, Voila! The Disease Prince, himself! I may have to do this, just for the fun of it -- he/she/it has always intrigued me... Cheers! I love all slime-related critters, and Juiblex already featured in one of our campaigns - I guess I'll do one of those www.merzo.net/Gallery_Dungeons_and_Dragons/Jubilex.gifNice example (can also used for a gibbering mouther), although I'm not sure how to sculpt mouths & maws (which is very high on my 'to learn'-list anyway). www.merzo.net/Gallery_Dungeons_and_Dragons/Jubilex.htm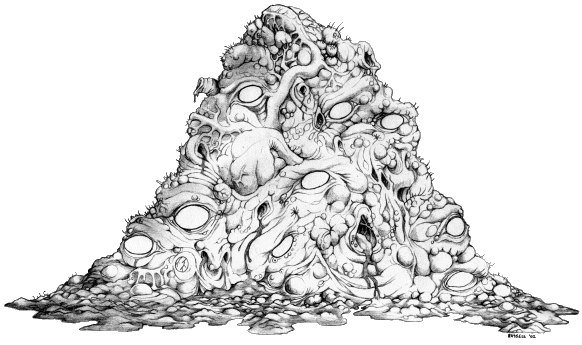 One of the best slime-related minis I've ever encountered: www.reapermini.com/forum/index.php?/topic/49629-zhoublexx-slime-lord-of-the-bleak-fens/ If I could ever sculpt that well,... *sight* ...but one can dream, right?  |
|
tauster
Paint Manipulator
Posts: 184
|
Post by tauster on Oct 4, 2013 5:32:54 GMT -5
I used clear crackle glaze on a project and wanted lighter colors in the cracks and darker colors above, and I essentially ended up doing that by washing the entire thing with the light color and dry brushing the darker color on the raised areas. If your darks/lights are reversed from that, it'd be way easier to paint the entire thing light then use watered down dark colors for a wash, sponging it away from the raised areas with a paper towel. Thanks for the tips! I'll try that sponging soon...
I've made a 'test field' on a larger piece of cardboard (15 x 30 cm), where I can experiment with different color shades: I used a cardboard 'scraper' to apply the paint which is easier than using a brush, plus you're able to apply it more evenly: i.imgur.com/8M2fu0p.jpgThat's how it looked after drying (about 24 hrs). i.imgur.com/UIiiVtR.jpgDetail shots: with a standard-sized mini for scale: i.imgur.com/q3qgJOn.jpgi.imgur.com/u8TnW2x.jpgI was surprised that the cracle paint caused an extreme bend in the cardboard (lenghtwise, with the center being bent up approx. 6 cm!). I reversed the dried cardboard and left it overnight with some wet kitchen paper draped over it, plus some weight in the center to press it back down, which complete did the job and levelled the tile back to flat. I absolutely love that texture! This will make great lava fields (once I found a color scheme that works) and also great 'cracked-up earth' terrain. Maybe this will also work as 'cracked ice', although the plates are bending up, which is not typical for ice... I'll also do a 'test-beholder' with this (waiting for a nice color scheme to present itself...) If anybody comes up with other surface types this technique can be used for, feel free to chime in! |
|
tauster
Paint Manipulator
Posts: 184
|
Post by tauster on Oct 4, 2013 5:21:09 GMT -5
I basepainted the veins of the fleshy thing from the post above: i.imgur.com/BCLdV55.jpgLesson learned: Some colors look extremely different (darker, in this case) when dry! I hed to repaint some places where the color was stretched too thin; you can see the difference between the wet and dried color in the foto above. It's not that I don't like that extremely dark shade of purple, but still... In the future I'll first try out new colors, either on a blank sheet or a material similar to that of the crafted thing, before potentially ruining the object to be painted. On the positive side, now that tha basepaint is on, the textures on the veins stand out better and I'm quite happy with the little 'veins' that I drew with the gluegun nozzle over the already dried glue strands. I think these will look greatwhen drybrushed, though I'm not sure how difficult drybrushing these small spaces will be - so far I had always use the drybrushing technique on large areas where I didn't have to take care on neighbouring areas... |
|
tauster
Paint Manipulator
Posts: 184
|
Post by tauster on Oct 4, 2013 4:29:35 GMT -5
Could always fiberglass over the wings. that would make it sturdy. Never hear of that method... Con you give a quick explanation or post a link to a tutorial or something? Thx!
Walnuts II: I'm looking for something to do with cracked walnuts. i.imgur.com/Ql4LmwN.jpgSure, they look like brains/heads or cerebral structures in general... I want to do something else with them, but can't find for the live of me some cool ideas. So I'm essentially looking for a little brainstorming session here with you guys. Stuff that floats around in my head but didn't really satisfy me: - They're essentially broken. So anything that is broken might go: Eggshells (that one's obvious), other egg-shaped objects... - Paint them metallic and see how that looks. Probably my next experiment. - Use them as cracked flagstones. Put many of them together to form a large, cracked object / field of rubble/debris - Some of the larger pieces look like the front & back of a small boat. |
|
tauster
Paint Manipulator
Posts: 184
|
Post by tauster on Oct 3, 2013 2:46:43 GMT -5
Has anybody ever used poker chips as bases for miniatures, spellmarker or small terrain pieces?I think they are a bit larger than one grid square, but if you play gridless this should be less of a problem. And even grid-players could use them for larger monsters. I personally couldn't care less, as our groups were never much interested in the movement part of battles... The advantages of these chips, from the top of my head: - made of plastic instead of cardboard, cardstock or some other material that could warp - come in standard sizes & huge numbers (100, 200, 500 pieces...) - most often sold together with a storage stand, some even come with a nice metal suitcase- dirt cheap - just get a used poker set on ebay! There are even rectangular ones, so you have more variety. Disadvantages: - more difficult to work with than cardboard (cutting plastic...) - not sure if they are paintable - many chips are stamped, so you have the casino's name or something else stamped in, which needs to be covered
@ DM Scottie: So I guess we can expect a beechnut video in the near future? Cool! @ northtroll: I hadn't considered using the cones as fungal growths... Neat idea! I know for sure that my players will be leery around those. But they will probably be leery around each and every new piece of dungeon dressing. Which is great for every crafting DM. 
|
|
tauster
Paint Manipulator
Posts: 184
|
Post by tauster on Oct 2, 2013 12:53:39 GMT -5
|
|
tauster
Paint Manipulator
Posts: 184
|
Post by tauster on Oct 2, 2013 3:41:05 GMT -5
I finally got around to continue working on the two things from posting #1. I decided that instead of making two identical builds, I'd make one a fleshy tentacle with hotglue veins (as per Scottie's tutorial) and one similar to a Purple Worm, glueing on small stones as 'spikes'. 1) Fleshy Thing i.imgur.com/SKVSdEr.jpgi.imgur.com/Qiazftz.jpgWeird thing: I took a picture against direct sunlight and guess what: A fleshy tentacle from hell can look like a heavenly tentacle, made from pure alabaster, complete with a holy halo and veins pulsing with divine goodness!  i.imgur.com/jCBVrSA.jpg i.imgur.com/jCBVrSA.jpg 2) Purple-ish Worm I like how the mouth turned out: i.imgur.com/DOw0aMF.jpgbut I had to discover that hotglue doesn't bond well with the clay I used - the stones fall off with the slightest touch. *grumbles* I tried to secure the remaining stones with copious amounts of superglue (locitite, if you care for the brand) and hope that this will be enough. i.imgur.com/iF7MBOi.jpg |
|
tauster
Paint Manipulator
Posts: 184
|
Post by tauster on Oct 2, 2013 1:28:07 GMT -5
I do the same kind of torches(more or less) but I also do them with the ring u get in the coke's as a base so u can use them as PC torches(the rings fit perfectly on round bases in case u didnt know)... srry about my grammar Neat idea! Can you please post a picture showing how that looks in play? |
|
tauster
Paint Manipulator
Posts: 184
|
Post by tauster on Oct 2, 2013 1:25:17 GMT -5
Yes they came all at the same time. Can't exactly say how long it took, as mine was delayed by the German Custom Authority, where I had to pay some taxes. Customers from the US and some other contries got theirs much earlier.
|
|
tauster
Paint Manipulator
Posts: 184
|
Post by tauster on Oct 1, 2013 13:59:32 GMT -5
Get the urge to steal sand from playgrounds. ...when you didn't resist the urge. ...when you didn't resist the urge and brought a plastic bag with you. Because you planned grabbing that fistful of sand even when you where at home. ...when you know which playground in your neighborhood has the best kind of sand. |
|
tauster
Paint Manipulator
Posts: 184
|
Post by tauster on Oct 1, 2013 13:31:06 GMT -5
Has anyone tried to sprinkle paint with an old toothbrush (or something similar) on a dungeon surface basepainted black substitute the texture spraypaint?
|
|
tauster
Paint Manipulator
Posts: 184
|
Post by tauster on Oct 1, 2013 13:28:23 GMT -5
...and I'm in the 1st wave of shipment! *happy dance* I've was in the 1st bones kickstarter and although I haven't even opened all the bags so far (it's been a truly massive mount of minis), it was worth every cent. I won't probably ever get arount painting each and every mini, neither of bones 1 or 2 in my lifetime (terrain crafting first, mini painting second), but these things don't get bad, so I hope my son will carry on when he's old enough (18 months and already a dragon lover). I absolutely love the mouselings and rat minis, too bad these are not parts of the core set but have be bought extra. I wish I could trade them for core stuff that I don't really need. Whatever, these will see good use in a few years, when my son and his friends get introduced to roleplaying by playing mouse characters. |
|
tauster
Paint Manipulator
Posts: 184
|
Post by tauster on Oct 1, 2013 3:09:31 GMT -5
nice paint job (much better than I could do!), and very informative posting. thanks!
|
|
tauster
Paint Manipulator
Posts: 184
|
Post by tauster on Sept 30, 2013 16:04:27 GMT -5
I rectified my mistake and hotglued all tentacles, plus added neodyms at the base as usual: i.imgur.com/EfTWeAe.jpg [edit 2013-10-01] glueing & neodym-ing 2nd batch is finished : i.imgur.com/FnNvpN2.jpg [/edit 2013-10-01] I definitely like the ' curlyness'. It doesn't really show in the picture, but man do these things squirm! Ialso added suckers by pressing the still-warm tip of the gluegun into the hardened glue, which partially melts it and leaves you with a crater-ish texture that looks like a sucker, a pock mark or something worse (I used that already on some of my mushrooms. poor things.) Next step will be painting... - Probably basepaint pure black, but perhaps I try out some metallic shade. Black with silver didn't work before, unless I try much more silver and less black. - Black with gold maybe? - Or basepainted black, with metallic purple stippled in the black while it is still whet (similar to Scottie's spell template)? Looks like I need some experimentation before I find a color scheme that looks as I want these things: reminding you of shadowmagic, necromancy and/or things from the outer dimensions. I'm especially at a loss as how to paint the sucker tips, so I'm open for your ideas and opinions! At least I have enough ... specimen to experiment with. * evil doctor's laugh* |
|
tauster
Paint Manipulator
Posts: 184
|
Post by tauster on Sept 30, 2013 15:48:38 GMT -5
Update: I experimented with the cardboard disc and painted in in a lava color scheme: i.imgur.com/TqUURxl.jpgI'm not completely satisfied, but at least its not as bad ad I had feared. Definitely need to try out more & different color schemes before doing the beholder... |
|
tauster
Paint Manipulator
Posts: 184
|
Post by tauster on Sept 30, 2013 14:00:48 GMT -5
...you used up 1 kg of hotglue in less than half a year.
|
|
tauster
Paint Manipulator
Posts: 184
|
Post by tauster on Sept 30, 2013 5:40:53 GMT -5
I normally try to avoid wordslike 'awesome', but this technique simply is awesome. A simple idea, easy to craft and resulting in a very realistic effect! Well done and welcome to the forum! |
|
tauster
Paint Manipulator
Posts: 184
|
Post by tauster on Sept 30, 2013 1:45:51 GMT -5
Cool stuff!
|
|
tauster
Paint Manipulator
Posts: 184
|
Post by tauster on Sept 30, 2013 1:35:50 GMT -5
Some months ago I purchased a pot of crackle glaze, just because I loved the effect. I was in a crafting stage where almost everything I did was somehow related to flames, fire and lava (it all started with Scottie's fire spellmarker). I intended to use the crackle glaze as some kind of 'hardening lava' effect, but never got the time to actually experiment with it, so the pot remained closed until yesterday. I figured it could make a nice rough &scaly hide of a beholder, so without any directions of use, I... ... took a hard cotton ball (3 cm diameter), ... punched some holes in there the eyestalks will ge glued on later, ... fixated them with toothpicks and ... liberally put a large-ish amount of crackle galze on it, while trying to keep the paint as smooth as possible (which was kind of hard because it draws whisps) I also painted a small (3,8 cm diameter) cardboard disc, so I could later on experiment on it without ruining the beholder. That's how it looks right after applying the paint: i.imgur.com/iKp72c4.jpgThis morning, I found it already dried (despite the label saying 24 hrs), and that's how it looks: Disc: i.imgur.com/qjqctSf.jpg Beholder: i.imgur.com/13kcZNG.jpg I am rather happy with the structure - the effect is as I expected it to be. No comes the question: How to continue? I realized that this glaze is available in different color shades, so maybe before applying it, I should have mixed some color in. And before that, pasepainted the sphere with the color I wanted to show through the cracks...? As an alternative, maybe I can use watered-down paint and wash it, hoping that the color goes (mainly) into the cracks, wiping the excess collor off the scales? Any experience / advice? The label says that this stuff works only on absorent materials like paper and cardboard, and you can see that the cardboard disc is quite bent. That's already something to remember for the next time... |
|
tauster
Paint Manipulator
Posts: 184
|
Post by tauster on Sept 29, 2013 3:10:19 GMT -5
(...) And on related news, I started the 3rd generation of tentacles, this time Scotty-style: i.imgur.com/54BlWZf.jpgI have no idea how long it will take for them to dry... Maybe I can continue to work on them already in the evening. It took several hours for the wood glue to dry and the 2nd layer finished drying yesterday. I wondered what happened if I stray from Scottie's tutorial and skip the hotglue part. You can see the result below:  Well, I'm definitely not satisfied. Skipping hotglue results in the things not looking like tentacles but like twisted paper. Serves me right: Skipping the hotglue - oh the blasphemy!  The upper batch is painted with straight (matte) black, the lower ones with a mixture of black and metallic silver. I was aiming more for 'starry night' effect, but it came out like glossy black with the silvery specks being visible only when you hold the tentacle right before your eye (and who would want to do this...). Lessons learned: 1) Don't skip the hotglue. At least not when it comes to tentacles made of twisted paper. 2) Work on the metallic black shade again, probably mix in less black and more silver. Next steps: Apply hotglue to the basepainted 'tacles, paint again. |
|
tauster
Paint Manipulator
Posts: 184
|
Post by tauster on Sept 28, 2013 13:12:06 GMT -5
...you think that the world would be a better place without the garbage collection service - evil dudes who take precious crafting resources to the landfill!  ...you're not sure what will run out first: your storage space or your wife's patience. |
|
tauster
Paint Manipulator
Posts: 184
|
Post by tauster on Sept 28, 2013 10:22:44 GMT -5
You see trash as a golden opportunity as opposed to landfill filler =) I second that. So much... |
|
tauster
Paint Manipulator
Posts: 184
|
Post by tauster on Sept 28, 2013 3:37:18 GMT -5
They look like something out of a B-horror flick. Great work! They really are disgusting -- I mean that in the best of ways... Cheers! out of a B-flic? Damn, I was aiming for an A... But I guess it's OK for a prototype series that's not even completely painted. |
|
tauster
Paint Manipulator
Posts: 184
|
Post by tauster on Sept 27, 2013 2:05:37 GMT -5
I added the red basepaint and man do they look scary now!  I had some color shade leftover that I used as an alternative, but it turned out that it dried to a matte, non-glossy finish. The glossy one was crimson / carmine red and it looks very much like raw , angry flesh. I'll have to experiment a bit to find a god shades for drybrushing, the 'eyes', the pustules and the sucker caps. These guys will be proper nightmares, I almost take pity on my players!
And on related news, I started the 3rd generation of tentacles, this time Scotty-style: i.imgur.com/54BlWZf.jpgI have no idea how long it will take for them to dry... Maybe I can continue to work on them already in the evening. |
|